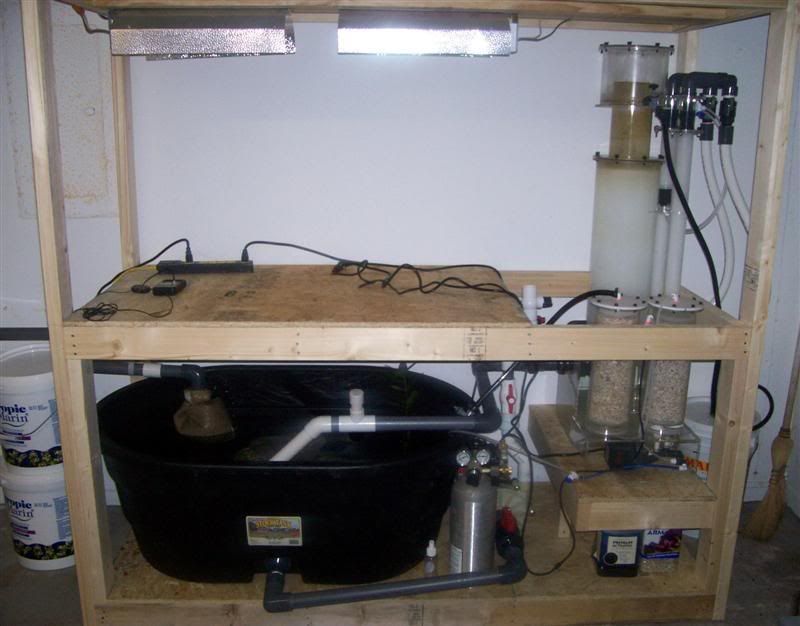
so, things are coming along, no pics yet sorry… the progression ones i took are all blurry… i had it on Manual focus (i know im below average). I have how it looks now. veneer on tomorrow and first coat of stain, so 1 day ahead… and i need to get the trim tomorrow as well as door joints
So i dunno about drilling, its just running through my head… hmm… i cant find any tanks that are already drilled for worthwhile prices…
Is it hard to drill i have seen videos on how, but im scared $hitless to do it…
Wow this thread got long. As far as drilling I might be able to lend a hand. I’ve been meaning to order new drill bits for a long time. I’ve drilled many tanks. That being said there is a risk every time. What tank are you thinking of drilling again?
I just have to remember what size drill bits for a 1" bulk head.
i cant find any tanks that are already drilled for worthwhile prices...you cant ???
I have a question about drilling. Does the odds of cracking get more or less likely depending on the location of the hole?
Is there a standard height where you would place the hole for an overflow? Does the hole need to be centered or can it be to a side?
Inquiring drillists want to know!
I have a question about drilling. Does the odds of cracking get more or less likely depending on the location of the hole?
Im sure it might, but its never been an issue for me.
Is there a standard height where you would place the hole for an overflow? Does the hole need to be centered or can it be to a side?
the “standard” for an overflow is on the bottom of the tank. installing an overflow through the side or back of the tank is pretty straight foward but there are a LOT of different ways to do it. my best advice to you is to find a method that is proven, because there are a lot of things that can go wrong when designing your own that might not be apparent right away. to answer you question more specifically, the height is important. your tank will drain to the point of the overflow if you dont incorporate an anti-siphon failsafe. you can put one low in the tank, but its not worth the risk IMO unless, like a standard overflow, you have an internal, watertight overflow area.
Im drilling the 38g DT tank, and probably have to drill the side of one of the 20g, or find someway to get water to flow between them.
And i could really use your help with the drilling… YGPM
i wanted to do the overflow at the top of the tank…
No i coulnt find any DT tanks that would work for under 300 bucks…
did you get my pm about the sump tank logan?
I have been thinking so much about the area under the tank, and im frazzled…
2 plans… 1 logical, one makes no sense

Red line=drain
Blue= linking pipe for 2 tanks
green= return
Black blotch= return pump
Purple blotch= gravity drains
Can you follow…
plan one is gravity feeds intothe sump, then the sump will have a pump that pumps it to the refugium, which then would have a return pump in it to take back to DT…
second, my fav. is drains into refugium, that fills like a tank, and when gets too high overflows, via gravity, into the sump. sump fills through (baffles in place) and gets shot back up to the DT
the problem is i have to drill a hole into the side of one of the tanks, and assuming that the tanks are the same height, there will be a horizontal pipe between them. Anyone else have any ideas?.. im frazzled
plan one wont work. you cant have two pumps.
:TWOCENTS use one tank that serves as sump and fuge.
ok, good,… ooooo good idea, lol 1 tank…
is the sump your selling me able to be all in 1… ?
it has baffles already in it, but you will likely have to reposition them for your use.
How would i go about hanging lights… the ceiling is 20ft away, and i could run a wire all the way down but i feel like this is a waste and a eye sore… so i was thinking somekind of metal spoke that is screwed into the stand, then rises like 4ft above stand, so i can hang the lights off them,
have any ideas on something that would work?
Im confused in piping…
Im going to use a mag 9.5. There will be a 1" drain, and it says it has a .75 outlet size.
few ?'s
How to i plumb the manifold in/what is a manifold/pictures could help if you could draw it?
Do i use pvc or flexhose?
i want do use those locline return ends, how do those get encorporated into the pvc?
.75 =3/4 inch
locline can be purchased for fitting inside pvc fittings or it will have a thread on end to be screwed into a pvc ips threaded 90 degree elbow
Okay, thanks for answerthing those ?'s…
Is that video a good guide… just dont know how to do the manifold part…
To do list: (personal reference)
1)Stain
3)Figure plumbing
4)Figure ATO
4)Get reactors
5)Lights
2)Sump
http://FlexPVC.com/ thats where i will order parts
I have another question regarding stand design.
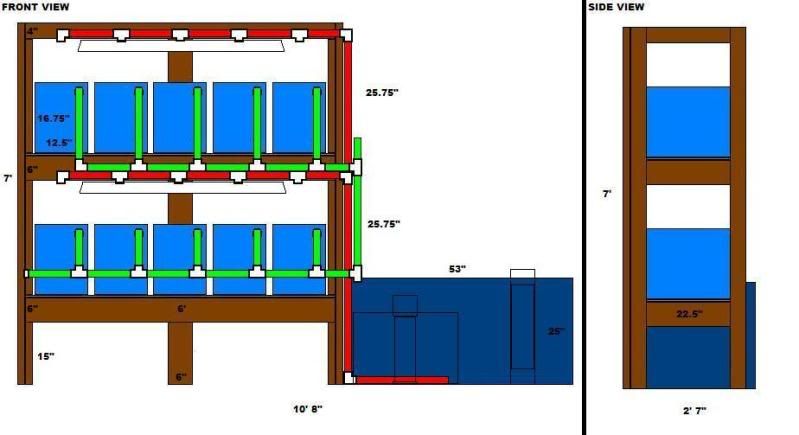
My design was going to initially maximize the internal area by having the non-load bearing supports on the outside of the unit similar to the picture I’ve provided below. This is less aesthetically pleasing but I believe it functions the same.
My question is regarding the 3/4" plywood that logans daddy mentioned should be free floating. In the example below it doesn’t look like they cut 2x4" corners into the 3/4" plywood on the bottom shelf. The plywood is sandwiched between the load bearing legs. Is that ok or would it have been better off to have the 2x4’s touching instead of having the 3/4" plywood between them?

that pic looks similar to something i built for my old 255g. it looks very sturdy to me. the only thing i would do differently, depending on what is going on the top shelf, is probably put another vertical support below the frame where the top piece of plywood ends. again, that would only depend on the weight of the load on that shelf.
my point with letting the plywood float has nothing to do with structure. EVERYTHING shifts overtime, if only slightly. my concern with screwing/nailing a piece of plywood to the frame would be having it “back out” over time and push against the bottom of the tank. Granted, its not very likely to happen, but floating it or gluing it is less work and will guarentee it not to happen.
Yeah, my proposed system will have a 6 foot span so I will definitely need to have another brace. I was going to use 2x6’s instead of 2x4’s for the shelves and back brace to minimize bowing. The rest of the construction will be 2x4.
I’ve updated my plans to this. It’s to scale using Microsoft Paint. Haha, not exactly CAD.

I’m not sure if you can see in my drawing what I’m talking about. But I planned on having a layer of 3/4" plywood between the load bearing legs. This is the only part of the design I’m not completely sure about. I’m worried that the plywood might compress unevenly or something and it’d be best to cut a space for the legs instead.
