controller box look amazing , nice work
Update 16: Plumb perfect…
50+ shims later I think we’ve got it plumbed in just right. I’ve cut all of the shims to length and they are now hidden under the stand. I was able to walk on the top of the stand and it doesn’t shift or shake. From what I’ve read stability is the key to making keeping even pressure on the silicone seals.
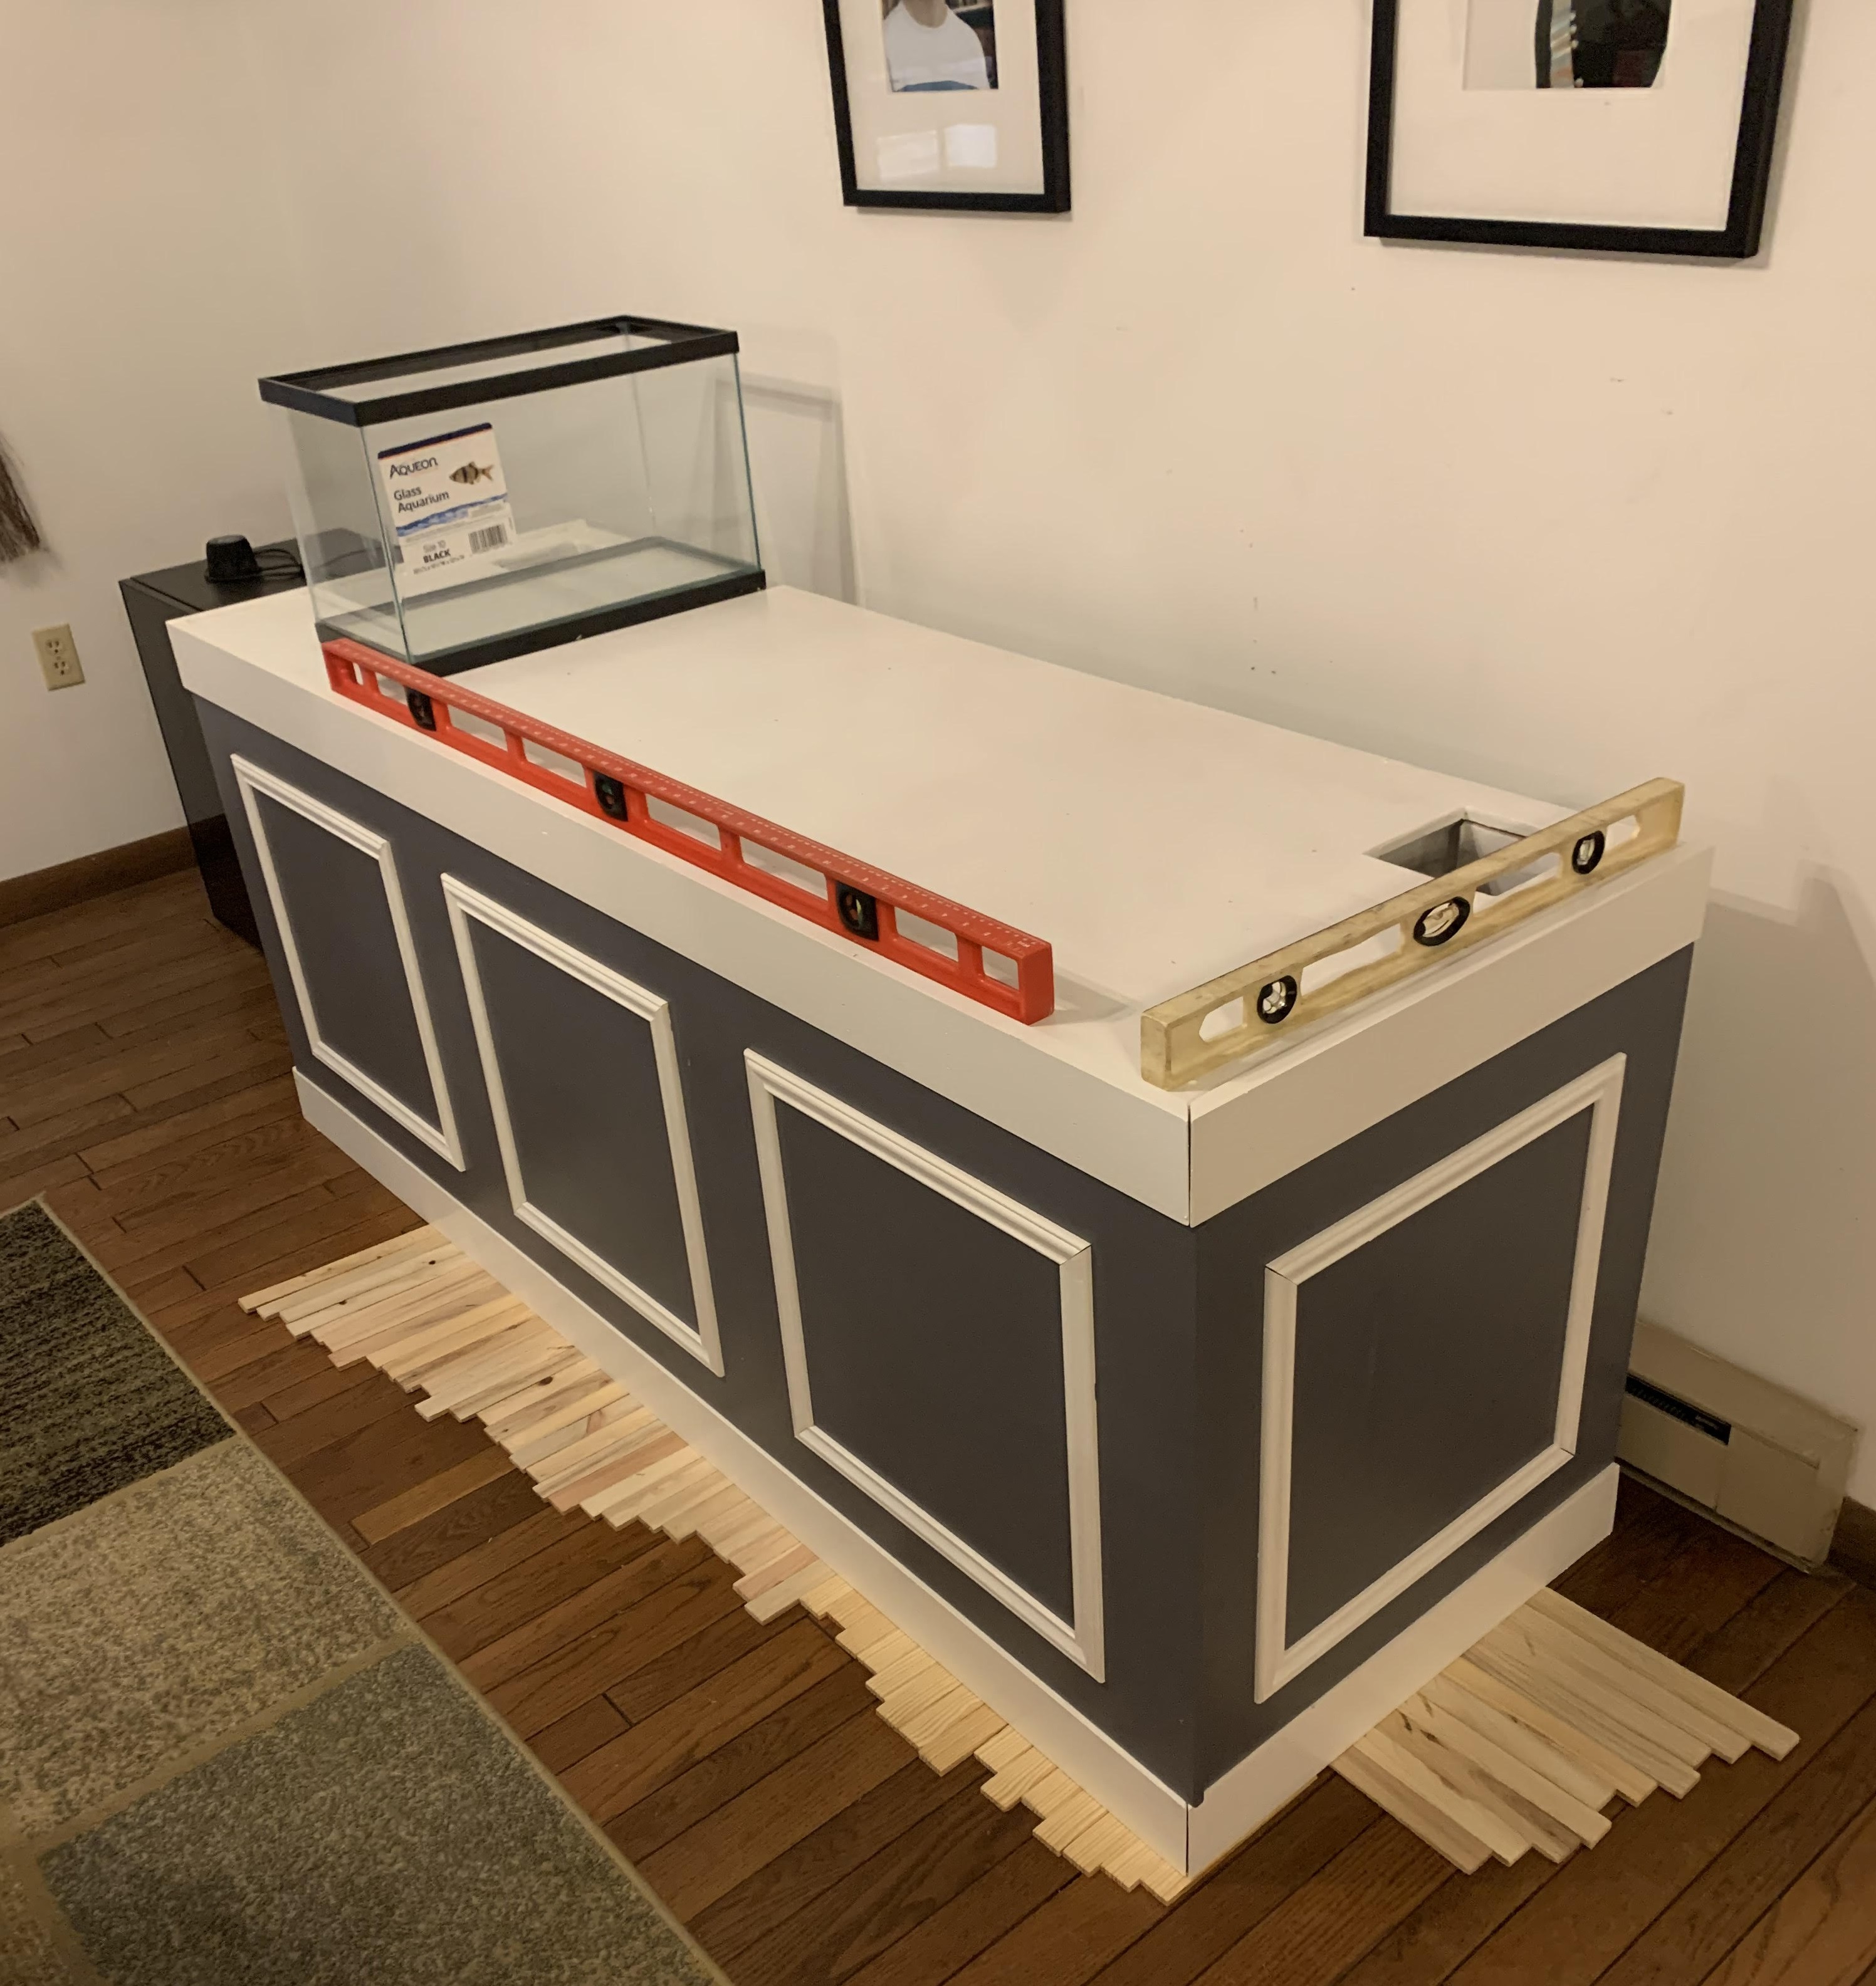
The movers are scheduled this week to move the tank from the downstairs to the upstairs. Given that the tank is 330lbs empty I decided to play it safe and have professionals move it. I current have the stand 5" off of the wall. Fingers crossed in a week the tank will be in its final location.
1 Like
Update 17: Moving the tank into place…
With some help from Pat’s Mighty Movers we got the 330lb tank up to the 2nd floor and onto the stand. It was a huge relief that they got the tank up the steps without any damage and that everything fit on the custom stand that I built! Honestly I don’t think I could have done it without them. I’ve used Pat’s Mighty Movers a few times and been very happy with them.


Now the fun begins…time to plumb everything in and do a wet test!!
1 Like
Update 18: Plumbing in the tank…
I didn’t waste any time plumbing in the tank. I went with blue and white plumbing to match my EcoTech gear. Overall I think it turned out pretty well. I tried to strategically add unions anywhere I may want to change or service the tubing later. I also bought some higher-than-average shutoff values. While they cost a few more bucks in an emergency I think I’ll be glad that they work years down the road.
For the most part the plumbing was straight forward although there were a few tricky 45 degree angles on the right side from the M2 to the return line. If you remember I originally had a 20 gallon tank that would gravity feed into the 40 gallon sump. The 20 gallon tank was planned to be a refugium.
Recently I’ve been debating if I want to do the refugium or use the space for other gear. For now I have both tanks under the stand but decided to just plumb directly into the sump. This will give me options down the road and I wouldn’t need a 'fuge anywhere until the tank has been established. For now I’ll be running socks, a protein skimmer, heaters and a return.


Onto the wet test…!!
2 Likes
Update 19: The wet test…
I’m happy to report…NO LEAKS! Phew. What a relief. The past several days were a little nerve racking moving the tank and plumbing the sump in. There is always the 1% of your mind that is thinking what would happen if one of the tank seals was damaged during transport, if one of the bulkheads failed, or if the stand wasn’t up to the challenge of holding 2000lbs. Fortunately none of those things happened and I can rest much easier. For the initial wet test I just used a garden hose and regular fresh water. I plan to let it run for a few days, drain it, and then fill the tank with RODI water.
I’ll also mention that the Marineland Cornerflo drains and returns are extremely noisy. Many hobbiest have complained online and done various modifications to quite them down. It’s so loud it’s actually distracting if you are trying to have a conversation at the dinning room table. One issue is that the siphon break on the return is a large hole and is high on the pipe. This causes a stream of water to spray out when you turn on the return. I solved this by placing zip ties over the majority of hole. This greatly reduces the effect but still allows a siphon break because the hole is not completely covered.
The second issue seem to be poor engineering. The two drains are rated for 500gph each but I’m struggling to get 175gph through each of them. I understand there are a lot of factors in the flow rate (including my plumbing underneath) but it’s clearly undersized for the size of the tank.
I’m also surprised at how they engineered the drain. The drain begins as a 1-1/2" pipe reduced down to 1" (shown in second video). That seems to be asking for a critter to crawl half way down the pipe and then get stuck. Also the drain has a small air vent on the top but it is much too small and there is loud gurgling in the pipes. I’m not sure why they didn’t use something like a durso to reduce the noise. Unfortunately I had to drill a much larger hole and run much larger tubing for air to reduce the gurgling. It’s surprising having to make all these modifications to a brand new factory built tank. I’m hoping Marineland is 10,000% better at sealing their tanks than they are at building drains… =)
For now my modifications have made the tank about 90% quieter and I’ll continue to refine the flow and air intake. Overall I’m very happy with the results of the wet test. Now I’ll need to drain the tank and fill it with RODI water…


2 Likes
HUUUUUUUUGE UPDATE! ![]()
Everything looks amazing. I think you’ll be thanking yourself later for putting those unions in.
As for the drains, durso style are known for being loud not only in the tank, but also in the sump. Luckily, there’s a really simple solution… the Herbie drain! It’s the step in between the Durso and the Beananimal. It would require you to convert one or both of your returns lines to be used for a drain though. I run a Herbie on my tank and it is absolutely dead silent.
That’s a good point - I didn’t think about modifying it into a Herbie style drain. I’m fine with using all four pre-drilled holes as drain lines and running some return lines up the back of the tank. Definitely a good option if I can’t get it quieted down. Note to self: run all future designs by TheEngineer first.
1 Like
Update 20: Adding saltwater…and other fun odds and ends…
Now that the wet test is finished it was time to drain the tank and refill it with RODI water. I’ll take a quick detour and go over my RODI system. If you are new to the hobby I’d strongly suggest you invest in a good RODI system with TDS meters and a pressure gauge or two. Having good water is foundational.
I use the MarineDepot RODI system and added a second chamber for resin. Having a second chamber allows you to let the first chamber of resin fully expire before replacing it while still pushing out 0 TDS water. Since I use a high volume of water the second chamber will pay for itself over time with the resin that I save. I also added the Aquatec booster pump which for me has been invaluable. It allows me to push water through the system at exactly 80lbs which makes the member work as efficiently as possible (most homes are 30-50lbs). The end result is that you make RODI much faster. In my case the RODI system is rated for 75 gallons a day but I can safely produce nearly double that volume by increasing the pressure to the recommend level for the membrane.

On the “business end” of the RODI system I installed the Aqua Flood Guardian. Again I’ve found this piece of gear invaluable. It is an optical eye and a solenoid that shuts off the water once the water level reaches the eye. I place the optical eye in a my RODI reservoir (in this case the display tank) and it shuts off the product water line once the vessel is full. I have my waste water line directly plumbed into a drain in my garage floor.

The RODI system is about 50 feet away in the first floor garage and the tank is on the second floor. I cut a single 1" hole in my floor which allowed me to run RODI lines to directly discharge into the tank. (Spoiler alert: I’ll also use this hole for automatic water changes in the future.) It took 36 hours to fill the tank and sump with RODI water. I did have to pause the system to refill one of the spent resin cartridges but other than that the system ran continuously. I can’t tell you how excited I was that I didn’t have to haul buckets to fill this tank.

Question: Have you ever wondered what your exact total water volume is? Me too. I had a plan to finally figure this out. Once the tank was 90% full I added all of the equipment, rock, and sand. Then I topped off the tank to the optimum level I had figured out from the wet test. Now I had a system of just RODI water that had been fully displaced by anything else that would be in the tank long term.
For two days I slowed added salt with the pumps running and kept track of every scope I put in the tank. Once the salinity hit 1.025 I knew how much salt I had added and my total water volume is…drum roll please…exactly 200 gallons. =) I then calibrated the Apex ph probe and my initial numbers are looking good.


Although I touched on the controller box in a previous post I wanted to share an update now that it has more gear. It is just plain fun to see all the Neptune and EcoTech lights change color as the lights and pumps go through their templates. It looks like I’m about to launch a satellite. I made sure that all of the cables are labeled on both ends and I literally used of 100 cable ties to keep things tidy and organized. I’m very glad I took the time to build it the box and methodically label everything. Servicing equipment down the road would be nearly unmanageable if I didn’t.


Because the tank is six feet long it is very hard to access some wires behind the tank. To help with this I added a small 1x3 behind the tank to help with cable management of the XR15 lights. The power bricks and cables are all zip tied to the board. When I need to connect/disconnect a wire I just pull the board towards me and the cables come with it. I’ve already needed to do this and it couldn’t have been easier.

I was also very curious about the power consumption of all of the gear. Currently everything runs through a dedicated 20amp GFCI plug. I’ll spare you the details on how I calculated this, but when everything is running (heaters, pumps, lights, etc) the system maxed out at around 11 amps and averages about 120 watts. It’s amazing how efficient DC pumps and LED lights are to run.
Now the cycle begins…
I did do a few things to help jump start the cycle. First all of the aquascape has been “cooking” for two months in brute trash cans. I did phantom feeding bi-weekly to help generate ammonia and the rocks had a nice slime coat on them when I got them out and put them in the tank. Second I used CaribSea Arag-Alive Fiji Pink Aquariam Sand which is an added boost of bacteria to the system. Finally I put 20lbs of mature live rock from my previous tank into the sump. I’m very interested to see what that does to the cycle. I know “nothing good comes fast” in this hobby but I’d assume that the bacteria has been given a good head start.

Finally and most importantly my cat approves of the sump. I think I’ll need to add a cover to the main display sooner than later… =)
1 Like
Another awesome update! I really like your equipment cabinet. I wish I had put a false wall behind mine. Would have made wiring cleaner ![]()
Update 21: Living the reefing dream…automatic water changes
Before I upgraded my tank I knew that I wanted to have automated water changes as part of the upgrade. I admire people who are dedicated to do large, regular water changes. I used to haul 4 buckets and dump them into a brute trash can for my 65 gallon tank. I didn’t want to deal with more volume than that and water changes on a 200 gallon system would be very labor intensive. As a newer hobbiest I’ve found that regular water changes seem to cover a multitude of small mistakes and I wanted to continue to do that practice on the larger tank.

It all starts with the mighty DOS pumps! There are plenty of other ways to setup auto-water change (and cheaper!) but the DOS does make it simple. It has pre-programmed templates and is extremely precise in the amount that is changed. As I’ve mentioned I drilled a 1" hole in my floor between the tank and my garage. This allows me to run water lines and aquabus cables between the upstairs and garage. I have the DOS mounted in the garage because it does make some noise when it is running.

Next you can see that I have three 32 gallon brute trash cans plumbed together. This is my RODI reservoir allows me to hold roughly 90 gallons of RODI water at a time. I also plumbed a spigot so I can easily add top off to my frag tank or a quarantine tank. The trash cans are elevated so they can gravity feed into a second set of trash cans containing the saltwater.

Directly next to the RODI storage container are three more trash cans. The one on the far left is a single can which I use to mix the RODI water and salt. The trash can in the middle and right are plumbed together giving roughly 60 gallons of capacity for salt water once it has mixed. I do use a pump to move the water from the mixing container to the trash cans on the middle and right.

Here is the entire set. It’s relatively inexpensive and out of the way. I considered buying larger water storage containers to avoid having six Brute trash cans but they were very expensive. Prior to this I have two Brute trash cans (one for RODI and one for salt) and it worked just fine.
So to finish the setup I have the Neptune DOS running lines from the salt water containers into the sump and then from the sump into a drain on the garage floor. I currently have it programmed to do a 15 gallon change over a 24 hour period. The Neptune DOS has the ability to do small daily water changes but I’d prefer to kick if off manually for now so I can keep an eye on it.

For auto top off I’m using the Neptune ATK (auto top-off kit). While the Neptune utility pump is strong enough to push the water from garage into my sump I decided not to go down that path. If the ATK ever malfunctioned it could potentially dump 90 gallons of RODI into my tank. I decided it was better to have the ATK pull water from the 10 gallon tank. I drill a small hole in the PVC pipe as a siphon break but everything else was pretty simple and straight forward. I have a pump in my RODI reservoir which can move water from the garage into the ten gallon tank. Which brings me to my next story…

Remember when one of our fellow club members suggested that I add a pond liner to the bottom of the sump? Smart advice. I accidentally turned on the pump that pushed RODI water into the 10 gallon tank and it began to overflow. Fortunately I was at home (aren’t we all?) and heard the trickle. The pond liner save my floor and made cleanup with a shop vac very easy. Since then I’ve wired the pump into the Neptune Apex complete with an optical water sensor, leak detection alarm, and an automatic shutoff of the pump after so many seconds. Hopefully I won’t make that mistake again…and I’m really glad I installed the pond liner.
All in all I’m very happy with the progress. The tank is cycling and water changes just got a whole lot easier. Can’t wait to start adding fish and corals.
1 Like
Looks great! Bravo!!
Update 22: Adding a flow meter
Automated water changes are completely awesome. Now that I’ve set up how to do it I don’t think I’ll ever go back. Now all I have to do is keep RODI and saltwater on hand. As I mentioned in prior posts I have a designated brute trashcan to mix new salt water between the two reservoirs. One small issue was that I always guessed how much RODI water I was adding to my mixing can. After repeatedly having to add salt, wait a few hours, and test I decided to add a flow meter.


I purchased a flow meter from Digiten and placed it on the end of the RODI spigot and VIOLA! The flow meter can either measure how much water you added or can be set to let a predetermined amount of water flow (such as 20 gallons) and turn off the water with an included solenoid. It also includes a temp probe and is really quite awesome. This takes all the guesswork out of moving water from one container to another. A very useful gadget for any reefer. I’ve included the link in case you are interested: https://www.amazon.com/dp/B07GSVHCQL/ref=cm_sw_r_cp_api_i_8MBpFb9RATQM4
1 Like
Oh, that’s a really cool add on. Got a link?
Sure do - updated the post!
1 Like
Update 23: Why yes it is my birthday…

Why yes it is my birthday and I’ve got a few frags that have been dipped, observed, and ready to go into the main display. Wish me luck! Hoping to give you the big unveil shortly.
1 Like
Update 24: Houston we have fish and corals!
This build has been an amazing journey to say to the least. I’ve thorough enjoyed documenting the build and really appreciate the suggestions and support of the club along the way. Reefing isn’t for the faint of hearted but is a very rewarding hobby.
I anticipate this tank will go through many highs and lows and hope I can learn from every aspect. If you are a saltwater rookie like me I hope this blog inspired you, gave you some ideas to try, and some of my mistakes to avoid. The tank is cycled, the equipment has been running well for a few months, and my parameters has stabilized. I think it’s fair to say the initial build of the 180 gallon tank is complete.
So what’s in the tank?
I plan to continue to slowly introduce corals and fish but currently have 7 red BTAs (and counting), a waving hand anthelia rock, the beginning of a Zoa garden (15 frags including eagle eyes, blow pops, scrambled eggs, sunbursts, pandoras, green palys, WWC mohawks, blueberry pie, and 2 “mystery” red zoas varieties), a red paly rock, a GSP rock, WWC Bling Bling and Meteor shows Cyphastrea, a green rhodactis, a candy cane frag, and a Xenia rock. As the tank continues to settle I plan to slowly add more LSP and eventually add SPS to the top of the rocks.
For fish I currently have a dart fish, an ocellaris clown fish, a pygmy angel, a niger trigger, a fairy wrasse, a coral beauty and a royal gramma. The fish are very healthy, happy, and get along nicely. Down the road I plan to add 1-2 tangs, a blenny, and likely a few other smaller fish for variety. I also have a nice cleanup crew of ~ 50 blue and red hermit crabs, 2 turbo snails, 100 astrea snails, three emerald crabs, and a few nasarius snails. I’ll continue to add to this crew and will add more species specifically to help clean the sand bed.
It finally all came together…so when’s our next frag swap? =)

2 Likes
How did I miss these posts? Congrats, it is officially a tank! ![]()
Tank looks great !!
1 Like
Very nice work, your tank looks awesome.
Priceless ![]()
Hey Adam, is this system still running?