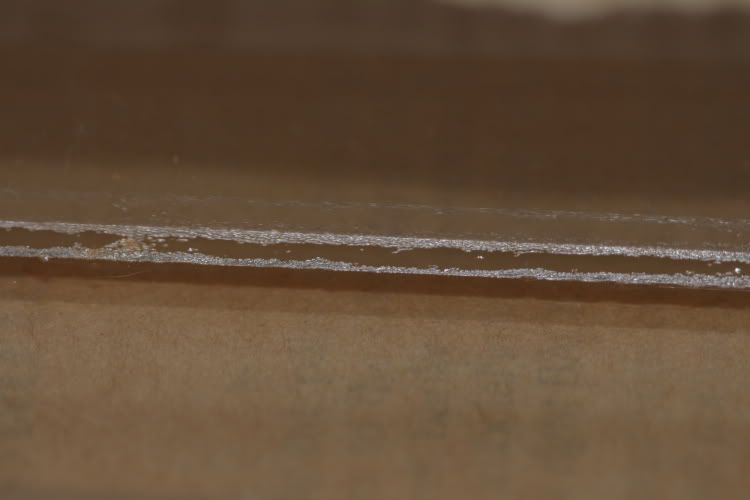
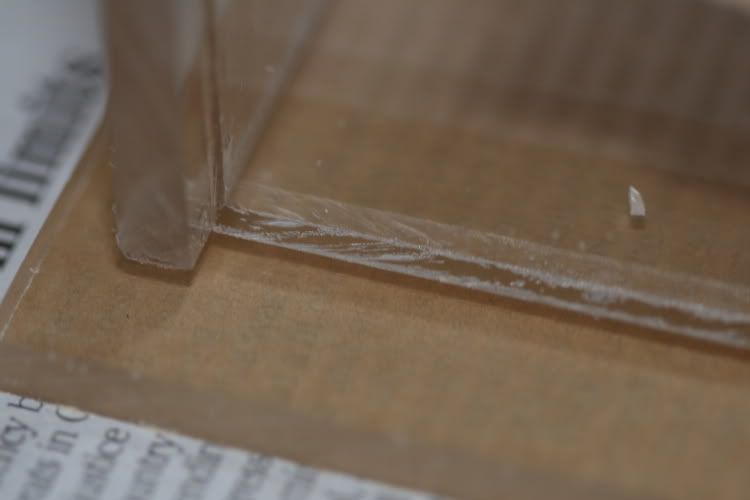
i have a question about the sump I am building. First one has to do with my joints. I seem to have gotten shrinkage or something in some of them and i am afraid that its not a very good bond. see below for pics:
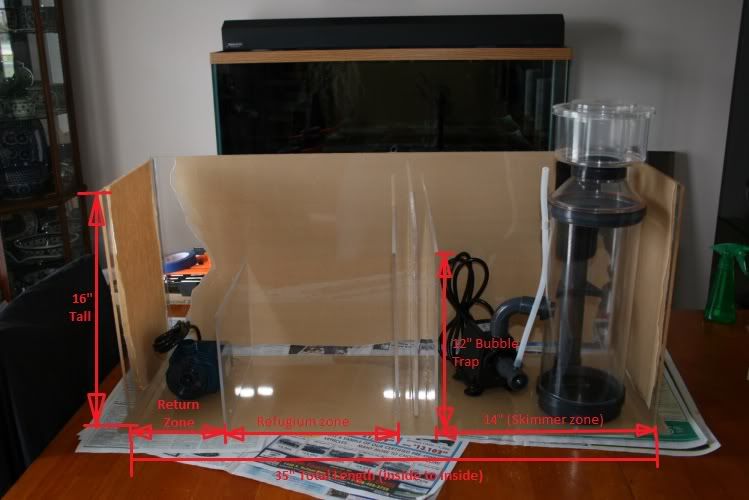
The second question is on the size of the refugium and return zones. here is a pic to help explain:
How big should each of these zones be, and how much water should be in them? How tall should the wall separating the two zones be?
[quote=“Porter, post:2, topic:1514”]
Appears to be air bubbles along a rough cut.[/quote]
Will those air bubbles cause the joints to fail?
I plan on lining the inside of all of the joints with a small bead of Weld-on #16 just for good measure. And yes there were some rough cuts on the acrylic due to the place I took the acrylic to have it cut down. I took it to Delaware Storefronts in Camden since it was local and they had said they could cut acrylic. I since wish I had just taken the time and cut it myself. I have since picked up a router and a table that I could have cleaned up the edges of the important pieces but didnt have it prior to putting everything together.
I plan on letting the sump cure for at least 48 hours and then completely filling it with fresh water out on my deck and letting it sit for a few hours watching for stress in the joints or leaking.
[quote=“Porter, post:2, topic:1514”]
The sump dimensions look fine to me[/quote]
Should I make the return zone just big enough to hold my return pump? Or should it be just a little bigger? The other thing I thought about doing was just making a “wall” big enough to hold my sand in my refuge and then putting a piece of eggcrate between the fuge zone and the return zone to keep the grass or whatever else (like snails) may go in there. Thoughts?
Yes, the bubbles will probably either cause the tank to fail immediately or shortly after you turn your back. I would redo it as I doubt a bead of weldon will adequately seal the joint. Search The Pins Method on RC
The smaller the return area the more topping off you will have to do. Larger is better IMO. I might consider reducing the left baffle height to 2 inches above the desired sand level and then attaching a piece of egg crate on top of the left baffle. This will keep the sand in place and hold back the macro algae. The return area will also be larger.
Snails will get everywhere and the small ones will eventually find the return pump. A small mesh strainer is required to keep them out. Also always have a spare impeller in case one makes it into the pump.
[quote=“Porter, post:4, topic:1514”]
Yes, the bubbles will probably either cause the tank to fail immediately or shortly after you turn your back. I would redo it as I doubt a bead of weldon will adequately seal the joint. Search The Pins Method on RC[/quote]
Yeah I tried the pin method but the piece of acrylic just kept falling off of them and it was making a huge mess. How would you suggest i redo them? is there an easy way to separate the two pieces now that they are put togehter? or have I pretty much ruined about $100 in acrylic?
I think i may go ahead and finish putting it together and filling it with freshwater and letting it cycle for about 2 or 3 days while sitting outside on the deck. I have seen a couple of other people that had the same problem and they used #16 to reinforce those spots. I have also seen where Melev talks about cutting wedges with scrap acrylic and placing those wedges over top of the questionable spots using #16.
I am not too worried about the looks of this sump since it is going to be inside my stand, so if it starts looking worse over the next few days, I may attempt to separate a couple of the pieces with a saw or something. and then trim the edges down with my router to take away the softened acrylic and then reattach them, we will see.
All my DIY acrylic tank bonds look like that or worse. it comes from uneven cuts, blade score, and just wiggling the pieces ever so slightly when assembling. a little wider gap and the thin weldon doesnt fill the seam. i put a couple beads of #16 on both the inside and the outside of all seams for two reasons. one it fills and seals any voids or leak paths. and two, the cured bevel bead acts as a kick plate to resist water presure. also when filled with water, the pressure bows the sides some which puts a twist and strain on the joints so they may craze a little more in time. but mine have been full of water for 6 or 7 years now. no leaks. still strong . but i do have gusset strips as a top rim to resist bowing and also a center strap across the top center to prevent spreading of the long sides. you probably dont need them. all those baffles glued inside will prevent bowing. so it looks pretty good to me. its not real tall, and the water level will normally be low. so glue 3 times with the #4 from the inside and out , with a good days cure between, and then one or two #16 beads inside and out.
I have my fuges beside the tank. and make them about half the area of the tank. or in the frag tank its a DIY acrylic 40 breeder size mostly for macro, a couple tangs and some frags. when it comes to fuges, the bigger the better.
Ok thank you very much for responding. I will have a top plate on this sump with at least 1 cross brace if not 2, one over top of the bubble trap and one over top of the wall separating the fuge and the return zone, only because i don’t want 1 brace directly over the fuge which would make it difficult to get any rock in or out of that area.
Thanks again for the help, I will keep everyone posted and will post pics once everything is done.
[quote=“IanH, post:10, topic:1514”]
How did this work out for ya?[/quote]
Well… if I take some close up pictures you can definitely tell that it was my first time building a sump. Some of the joints have quite a few bubbles in them. My router bit actually messed up somehow and when I was trimming the excess acrylic, it actually marked up the face of the acrylic. And when i put the top on the sump and cut out the opening to leave the 2" lip, it didn’t turn out the prettiest… I also got a little messy with the #16 when putting the bubble trap and baffle between my fuge zone and return zone.
But with all that said, I put freshwater in it yesterday and it is sitting on my deck as we speak. I don’t have any leaks that I can see, I will know better when I get home today and see how much the water level has dropped, if it has dropped any at all. I also took my hands and pressed out on the corners with the sump full of water to add more pressure just to see if everything would hold and it everything held.
I am going to pump all of the water out of the sump when I get home tonight and then hook up my return pump and skimmer and let them run for a few hours just circulating water in the sump. I think this weekend is the big weekend that I am going to start everything. I will probably take a trip down to Dr. Mac and pick up 3 or 4 more bags of that BioActive live sand. He seemed to have the best price that I could find.
I will take some pictures of the sump when I get home tonight and post them.
If I had to do it over again (which I probably will next summer - 2010), I will cut my own acrylic with my router. I will also make it a little bit longer and not quite as tall. I am going to have fun trying to get the cup off of my skimmer because of the height of my sump compared to the door openings on my stand.
All in all, I am very anxious to get this tank started and the wife is glad I am finally able to get all of the stuff off of the kitchen table and off of the ground and in the tank.
Sounds like it turned out reasonably well, congrats!
[quote=“ihuntinde, post:11, topic:1514”]
All in all, I am very anxious to get this tank started and the wife is glad I am finally able to get all of the stuff off of the kitchen table and off of the ground and in the tank. :)[/quote]
billy, listen, i have to work sat. morning. but if u have any issues or questions etc pm me your number and i will swing down and gladly give ya a hand. i am sure your brother is anxious to get it going.
bj
[quote=“fishguy9, post:13, topic:1514”]
billy, listen, i have to work sat. morning. but if u have any issues or questions etc pm me your number and i will swing down and gladly give ya a hand. i am sure your brother is anxious to get it going.
bj[/quote]
yeah, I am not sure who is more anxious.
So after it sitting for 1 full day full of water, the water level dropped about 1/8 of an inch. Took a close look and i have a small pinhole leak in one corner right at the bottom. So I went ahead and emptied it out just now, gonna let is sit for a little bit and dry most of the water out of it. gonna put a small bead of #16 on the inside all the way around the bottom for good measure and then put some on the outside too in the spot where its leaking. Once I do that and I fix the couple of spots where my baffles are letting water seep through along the floor, I should be ready for saltwater. So I am guess by Sunday, I am going to do one more freshwater test, let it sit for about an hour, and then finish up my plumbing, which I just started.
BJ, I will let you know if I have any issues, thanks for the offer. Cam is real anxious, even thinking of putting off studying for exams if I am ready to start with saltwater. haha.