That was the 75. It got too dark to do the 20L before we got around to it.
Al took the 20L home to do, heard from him this afternoon that he was going to go do the 20, but haven’t heard back that it was done.
Anyone wanna bet he broke it?
LOL<
That was the 75. It got too dark to do the 20L before we got around to it.
Al took the 20L home to do, heard from him this afternoon that he was going to go do the 20, but haven’t heard back that it was done.
Anyone wanna bet he broke it?
LOL<
My guess is he was seen messing with a tank and now hes buried in the back yard for spending to much time on fish tank stuff. ;D
I’m with Icy. That may have been the last tank he’ll ever bring home, lol. “I swear hunny it’s not mine! It’s not mine!”
Al, “How did I miss the start of this thread?” I am asking myself the same question. I thought the board had been slow the last couple of weeks and I find this three page thread. I never got an e-mail about it.
I would say that an auto top off is not only doable with out a faucet around, but even better. If you want to create something that tops off with as much water as the city can pump into your building then go ahead and use a faucet. Float valves and water level sensors are not yet designed fool proof and will fail at some point. I would never use an auto top off unless it was set up with a small source like a bucket of water with only a couple of gallons. Then when the float valve does fail only a couple of gallons end up in your system which will hardly kill anything.
Side note, might be fun to have the auto top off drip into the fuge and fall onto the leaves of a mangrove dusting the salt creep off its leaves. If you don’t set it up this way and want to keep mangroves at least twice a week you will have to dust off the leaves anyways. This could be easily changed in the future, but might as well set it up right the first time.
Best part of Al’s design is something I was going to point out. A fuge often works best when it overflows into the display. For most fish and many corals, there is no better food source then live pods.
Found at least one improvement to be made on Al’s plan. I would replace the common switch for water changes with an Item 606396 Model 12438-CC on this website: http://www.staples.com Check it out, you’ll like it. ![]()

I could do that too
Yeah Craig about that 20L…Come get it before my wife kills me. Its drilled
Your 20L is missing this


![]() been planning on doing that for about 4 years now. Ah, the plans I’ll never get to.
been planning on doing that for about 4 years now. Ah, the plans I’ll never get to.
OK. I’ll pick up later. You working tonight?
Hey Craig do you have any other tanks to drill? I want to try one at high speed with no pressure; supposed to work better and still not ruin the bit. Slow or fast no problem as long as it is kept cool and you don’t press on the tank.
I don’t at the moment, but I was thinking of adding a 20L as a frag tank plumbed between the sump and the fuge.
I’ll see if I can find someone selling a used one so you can play…for the betterment of the club of course.
Think I’ll hit PetCo tomorrow for their $1/gallon sale. Thanks for the reminder xxownagexx.
In the meantime I think I have the layout figured out for the new tank. Please pardon the kindergarten-esq quality of the image.
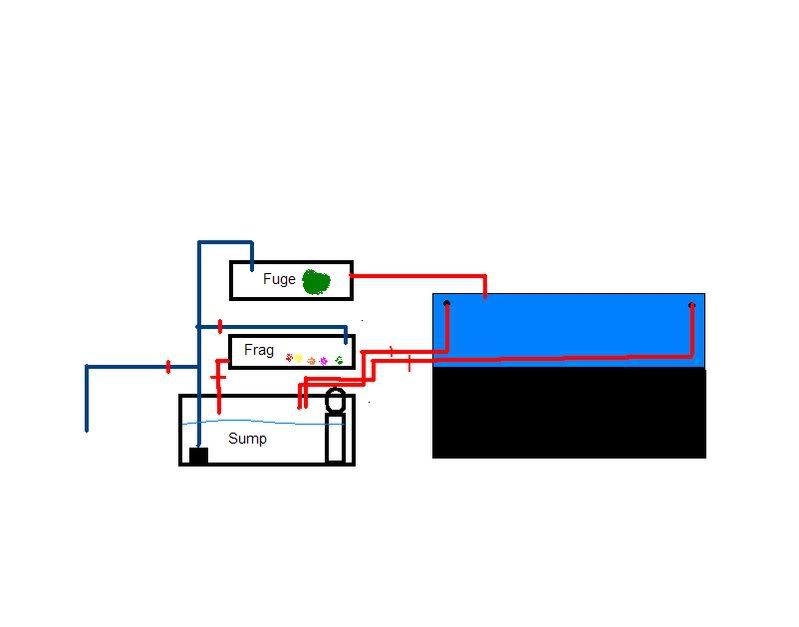
Main tank drains to 29g sump through (2) 1.5" drains. Skimmer runs in sump with a baffle to keep the pump submerged to the correct level.
Return pump (mag 9.5) T’s off at 2 places - one goes to 20L frag tank with a valve to control amount of water and flow entering frag tank. 2nd T goes off other side to either the main house drain or a bucket, (depending on how much I trust altering the main sewer line from the house). Again with valve to shut off water flow and prevent any “back-up” from sewer line idea.
Main return line then continues up to the 20L fuge, which will gravity feed through (1) 1.5" return line back to DT.
I figure the Mag should push enough water at with head loss (less then 4 ft) to adequately supply all areas. this will also give me somewhere to grow small frags as I get / cut them with the ability to control flow depending on what frags are growing, or bypassing frag tank completely when empty.
Of course this image does not include the water sensors, auto-top off, water change system, and whatever other crazy ideas Al comes up with since he can’t build anything at his own house anymore.
Oh and this will all sit in the largest rubbermaid container I can find to catch the occasional “drips”
Couple of suggestions:
I would add a baffle in the frag system to regulate water height instead of just a valve. Either that or move the hole in the tank higher.
In order for the drain to work you will need a valve to shut off the fuge.
I would use a bigger pump. mag 9.5 is 950 gph with zero head. You will have 6"V, 5’H, 2gate, 3 90degree, 1 T, probable 1 union, 2 exits and 3/4" pipe.
According to the RC Calc = Total losses are 9.16 feet of head pressure, or 3.96 PSI. with a flow rate of 484 GPH. This would be best case.
Quiet One 5000 Wet / Dry 1330 gph 1" MPT / 1" MPT 6.25" x 4.25" x 5.25" 10.80 ft 5.15 lbs
Total losses are 7.71 feet of head pressure, or 3.33 PSI. with a flow rate of 627 GPH.
Personally I think the fuge is more then large enough to house the fuge and frag tank with out the need of the extra tank.
Edit… If you were lucky and got 500gph from the mag 9.5, when you split the output between the fuge which returns to the display and the frag tank which returns to the sump you will have a lot less turn over then you think. Probably less the 250 gph
Looks like a good setup to me, other than the 3 small things al mentioned. I would keep the Fuge as well as the Frag Tank. If you do any serious amount of cutting you’ll want the frag tank just so that you dont lose anything. I know I recently lost 4 frags SOMEWHERE in my tank, and ill be #@%!ed if I can find them. This is especially true when you have fish that like to pick up stuff and move it on their own like my maroon clown. She takes stuff right out of the frag rack and drops it where she feels like.
Also if you can’t find a tupperware container to line the bottom of the closet for water spills you could always use plywood. Coat it with a couple good coats of a quality paint to seal it on all sides, assemble and add drain line. The sides for the closet will support the “box”. Then caulk the seams to complete the water tightness.
I found this thread on RC today.http://reefcentral.com/forums/showthread.php?s=&threadid=1442357
It is hard to see in the picture but he is using a fiberglass based product to create walls for a frag tank. This would work for your closet bottom (Although do a better job of applying silicone then he did) The side walls of your closet will be the support for the thin fiberglass walls.
[quote=“A.T.T.R”]
thought id pose a lil info about FRP panels that i am using in my tanks lately
home depot product number localy is A121-586
these boards are usualy found near the lumber area with other decrotive woods and panels
frp is fiber reenforced plastic panels
they are essentialy fiberglass panels that are easy to cut
seal with silicon and are rather tough ( you can tear them but… drop somthing on them and they stay strong)
white highly reflective and waterproof[/quote]
i can speak from experience that you have to use an epoxy base paint. you will just create a lot of headaches if you dont. im using it now to construct my son’s turtle tank. i did a lot of homework and trial an error, and trust me, water will find a way through paint, silicone, etc. the problem is that epoxy paint is VERY expensive. the stuff in boat stores is not safe to use. i bought mine from aquatic ecoystems, and after the hazardous shipping fee it cost me $92 for a gallon. i do have about 80% of the gallon left if your interested. the stuff is awesome.
Since this will be for spill if they happen the marine paint would be fine. For that matter he could tompsons water seal it as all he needs is for it to hold a spill long enough for it to drain. The fiber panel would be the easiest still. No paint just a bead of silicone.
oooops …guess i didnt read it through 100%, all i saw was frag tank. even if its just for spillage, you probably should build it to hold water for a reasonable period of time(ie vacation). if you simply use paint or thompsons your going to come home to a mess. marine paint will work fine but its so expensive. the boat stores also sell a generic epoxy kit that is for repairs. i would use a garage floor epoxy sealer. its not designed to bond to wood, but it should work fine in this scenario and its reasonabley cheap.
Mag 9.5 just came in this weekend. Being the impatient slob that I am, I swapped it for the crappy return pump I’ve always had in the 92.
HOLY MOTHER OF FLOW!!!
I’m going to have to reconfigure the whole aquascaping, I’ve got yellow polyps on as far away from the return as humanly possible getting blown around like they attached directly to the output of a power-head.
Now I’m thinking it’s a shame to waste this much flow gravity feeding the new tank.
le-frog
It won’t be wasted. As long as the pump can move it up to the fuge it will make it to the tank. I will do a test this week when I get a chance to test flow but I guarantee it will be equal.
Scale is way off but you get the idea

The gray bucket will act as the water source bucket #3 is the display tank. The first is gravity fed. The second will represent the water going from the display tank to the sump and fuge all dropping from the “display tank”. The head height will be about the same. Also I did not include the frag tank as it will not change the results since it will be the same on both tanks. I will time how long it takes for the mag 7 (in this case) to fill a 5 gallon bucket. I don’t think it eill be much different. I will use all 1 1/2 inch pvc for drains and 1/2" for pump lines. The mag 9.5 uses 3/4.
In the Diagram on the left bucket 2 will be filled to the drain line.
In the Diagram on the right bucket 1 will be filled to the drain line also. These 2 buckets will have the drains at the same height.
Thankfully I can use the same bucket over as I really dont want to have to cut a mess of buckets. I will get you the results by Saturday or so.